

How To Enlarge A Drawing
Do you have a small reference photo you would like to enlarge for painting? Maybe a traceable you downloaded from a tutorial or a beautiful landscape photo you took that would look great on your living room wall.
There are a few methods you could use to get your reference photo onto a larger canvas. Some require technology and some just need a pencil and ruler.
Of course, the simplest method is to just draw it larger, but not all of us can draw well enough to keep the proportions correct and get all the details, such as eyes, in exactly the right place.

Below I have outlined a few easier methods to enlarge your reference photo. Hopefully you can find one that suits your purpose.
I used a simple colouring sheet from my site to demonstrate since I think it is easier to see but these methods will work with any picture.
If you want some simple drawings to practice with you are welcome to use any of the colouring sheets from my Colouring Pages for Children page.
This post may contain affiliate links. If you click a link and buy, I may receive a small commission. Please see my full privacy policy for details.
Grid Method
The grid method is as old as drawing itself. You only need a pencil, ruler, your reference photo and a larger piece of paper or canvas.
Since you will be drawing grid lines over your reference photo you may want to print off a copy of it or use a photo you don't need to keep.
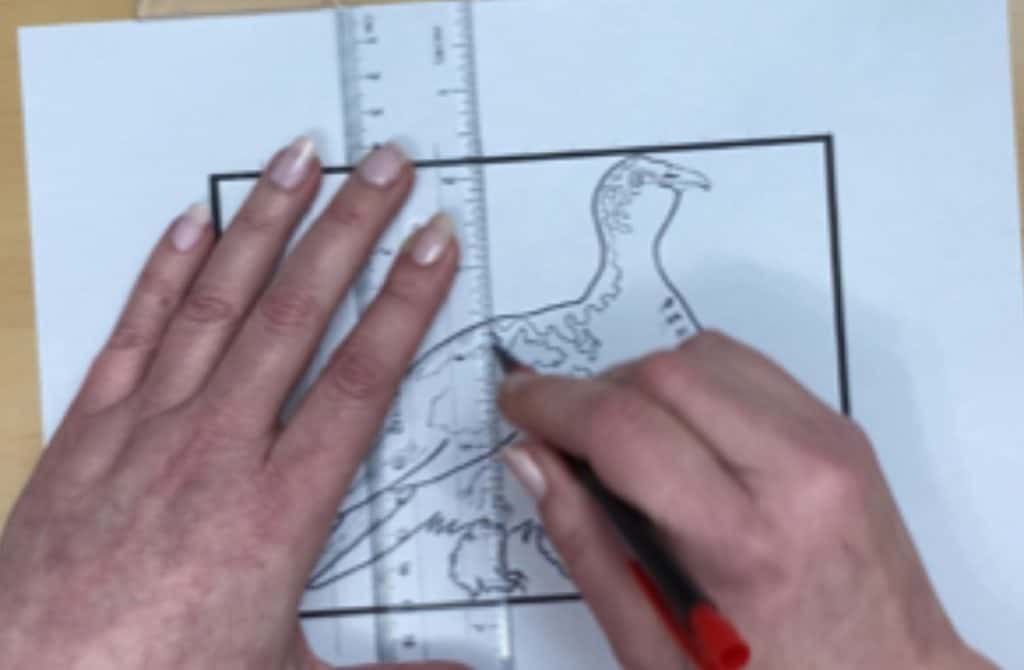
- Divide your photo or traceable into grids by drawing evenly spaced lines, both horizontally and vertically. You will get a result similar to graph paper. For this example, I have used 1/2-inch squares.
If you have photo editing software such as Photoshop, you can use this to draw your grid on your computer. Similarly, online graphics programs such as PicMonkey or Gimp will work too.
These programs are convenient but not necessary. A good old-fashioned pencil and ruler works just fine.
- 2. On another larger paper or canvas, draw a second grid with the same number of squares. This grid will have larger (or smaller) squares than the first.
So, if the first grid was 1/2-inch squares, the second would have larger squares. In my example the second grid has 1-inch squares. This will double the size of my original picture when I have the finished drawing.
If you wanted to make your drawing smaller you would draw grids that were smaller than your original, say 1/4 inch.
Number each square down one side and add a letter to each square across the bottom on both the original and your working surface. This will help you keep track of which square you are working on.

- Compare your reference photo grid to the enlarged grid you have drawn on your canvas. Going square by square, draw the contents from the grid on your reference photo into the larger (or smaller) squares on your paper or canvas.
Take your time and fill each square with the lines and shapes of the squares on the original. You can tweak the overall picture when you have finished your grid drawing if necessary.
Helpful Hints For Using a Grid:
It may be a good idea to draw your enlarged picture on a large piece of paper rather than your painting surface. If you need to erase frequently like I do, your surface can get very messy.
You can transfer your finished drawing, minus the gridlines, to your painting surface using transfer paper or another method.
If you are using acrylics and going to draw directly onto your painting surface, you can use a watercolour pencil. The watercolour marks will dissolve or be hidden by your paint, so you don't have to worry about grid lines showing through.


This method should work fine with watercolour as well, but I haven't tried it out with oil paint. You may want to test it on some scrap paper or canvas before proceeding with oils.
Use a T square to draw the lines. You can line up the top of the T square with the edge of your paper or canvas to help you get straight lines.
If you are drawing over a dark picture or black canvas or paper use a white pencil. A white charcoal pencil, watercolour pencil or pastel will help you see the lines better.
Using Your Printer to Enlarge Your Photo
If you have a printer you can use it to enlarge your photo. The one drawback of this is the larger you make your photo, the more pixilated it becomes.
This might make it a little hard to see fine details, but it should be good enough to get the basic lines and shapes.
All printers are different and have slightly different settings. I am using my own printing program as a guide but you should be able to use this to set up your own printer to print off the enlarged photo.
- Download your PDF printable from whatever website your tutorial is on or upload your own picture that you want to enlarge and save it as a PDF.

- Click print. If you don't see an option to print, right click on the picture and in the drop down menu there should be a print button.

- In the print settings, click poster.
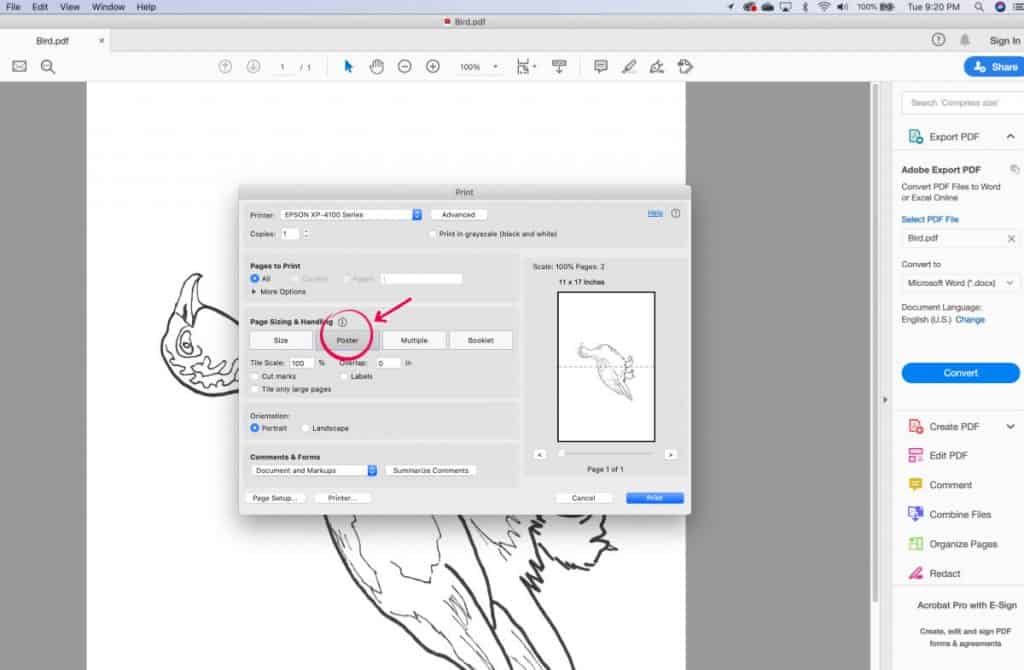
- Adjust the scale to a higher percentage. I changed mine to 150%. You can also check the box to add cut marks as a guide for trimming the edges of the paper. You can add a slight overlap as well. I usually add 0.005 to give me room to trim the page.
You can see that the size of the picture is now 17 x 22.

- Print your image. Some programs will print little indicators where you can match up the sheets to form the enlarged photo.

- Tape the sheets together and you have your enlarged reference photo.
- Transfer your photo to your canvas. After transferring the picture, I usually tape the sheet to the wall behind my easel so I have a quick reference to look at while painting.
Helpful Hints For Using Your Printer:
When taping your sheets together, I find it easier to trim the white border, if there is one, from some of the sheets close to the placement marks to make it easier to line them up.
For example, I trim the right side and the bottom of the first row of sheets. Then just the right side of the second row if you only have two rows.
If you have three rows, trim the right sides of them all and the bottoms of the first two rows and so on for more rows.
I think you will understand it better once you start doing it. Some things are hard to explain clearly.
I usually print my picture in greyscale. Not only is it cheaper, but that way you have a great way of seeing where the lights and darks and midtones are in your painting.
When I am finished tracing my picture onto the surface, I usually pin this poster to the wall behind my easel. That way I have a quick reference to see where the lights and darks are.
Sometimes the printed sheets can be a little blurry, but you only really need to trace the basic lines onto your surface unless you have really complicated details. The rest you can usually fill in yourself.
You can also darken the lines in photoshop before printing if you have this program.
Alternatively, you can print your picture off at its regular size and use a marker or black pen to darken the lines. Then scan it back into your computer and continue with the enlarging process.

Tracing Directly From the Computer
You can also trace directly from your computer using tracing paper. Just enlarge the photo on your computer and tape the tracing paper to it.
Trace the outline of your enlarged photo onto the tracing paper. From there you can trace it onto your canvas or larger paper. See my post on How to Transfer a Reference Photo.
This method may not work very well on touch screens unless you have the ability to turn off the touch function.
This method basically turns your computer into a light box. I know of many artists who have enlarged and traced their photo this way and I have done it myself but I am not sure if it will damage your computer screen over time. You should use your own discretion when doing this.
There are other methods of enlarging a photo such as using a projector or having it enlarged at your local printer but the methods discussed above are the cheapest and easiest to do.
I hope you find a method for enlarging a photo that works for you. If you have any questions or advice, please leave a comment below.
We also have a free Facebook group Trembeling Art Creative Corner where you can find tips, inspiration, fantastic artwork and a group of helpful supportive artists. Feel free to join us. 😊

Thanks for reading. 😊

How To Enlarge A Drawing
Source: https://trembelingart.com/how-to-enlarge-a-picture-to-paint/
Posted by: fernandezving1979.blogspot.com
0 Response to "How To Enlarge A Drawing"
Post a Comment